Letter, Alphabet, Font, Rhinestone: Mastering Templates for Stunning Creations
There is a unique sparkle that catches the eye when light hits a custom creation, and nothing captures that glamour quite like rhinestone designs. Whether you are a small business owner looking to expand your product line or a hobbyist wanting to elevate a personal gift, the appeal of Letter, Alphabet, Font, Rhinestone templates is undeniable. These designs offer a ready-made solution for adding personality and shimmer to various projects. However, the path from purchasing a digital file to holding a flawless, sparkling finished product is often paved with technical nuances that beginners and even seasoned professionals sometimes overlook.
When you purchase a rhinestone template, you are not just buying a picture; you are acquiring a specialized set of instructions for your cutting machine. The market for these files is vast, but the quality and usability of the files vary significantly. To ensure your investment yields professional results, it is crucial to understand the ecosystem of digital design files and how to navigate the common pitfalls associated with them.
Understanding Your Digital Arsenal
Upon purchasing a quality set of Letter, Alphabet, Font, Rhinestone templates, you should expect to receive a bundle of file formats. It is a common mistake for users to download the entire folder and immediately try to open a file without understanding its specific purpose. This often leads to software errors or importing the wrong file type, which can result in jagged edges or incorrect sizing.
A standard bundle usually includes SVG, DXF, EPS, AI, and PNG or JPEG files. Understanding the distinction is the first step toward efficiency:
- SVG (Scalable Vector Graphics): This is the gold standard for Cricut Explore and Silhouette Designer Edition users. It allows for infinite scaling without losing quality. If you are using a modern cutting machine, this is likely your primary file.
- DXF (Drawing Exchange Format): This format is a lifeline for users of the free version of Silhouette Studio. While functional, it is worth noting that DXF files can sometimes load slower in the software because they are not "optimized" in the same way SVGs are.
- EPS and AI (Vector Formats): These are essential for professional designers using Adobe Illustrator, Corel Draw, or Inkscape. If you need to edit the font or modify the letter spacing (kerning) before cutting, these are the files you need.
- PNG and JPEG: These high-resolution (300dpi) files are primarily for printing, not cutting. They are perfect for sublimation projects or mockups, but attempting to use them for rhinestone cutting will result in poor quality outlines.
The Hidden Trap of Font Styles
One of the most significant errors creators make when working with Letter, Alphabet, Font, Rhinestone designs is underestimating the complexity of the font style itself. A script font with flowing, cursive connections looks elegant on screen, but it presents a nightmare for rhinestone application.
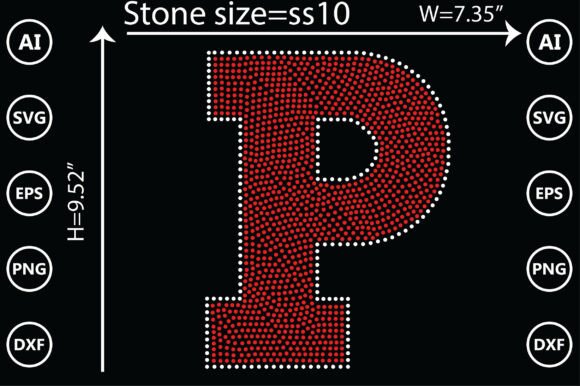
Rhinestones are physical objects with a fixed diameter (usually SS10, SS16, or SS20). They cannot bend or curve sharply like a line of vector art. If you choose a font with extremely thin connections or sharp, intricate serifs, you will encounter two major issues:
- Structural Instability: The connections between letters may be too narrow to support the stones, causing the design to break apart during the weeding process or when applying heat.
- Readability: Highly decorative fonts can become unreadable once translated into circles. The "noise" of the rhinestones can obscure the actual letter shape.
The Better Approach: Always prioritize bold, sans-serif fonts or blocky styles for rhinestone projects. These provide ample surface area for the stones to adhere to and ensure the text remains legible from a distance. If you must use a script font, increase the size of the design significantly to allow the stones to follow the curve without overlapping awkwardly.
File Preparation: The Step Most People Skip
Imagine spending hours weeding tiny plastic dots only to realize your design is mirrored incorrectly, or it is too small for your t-shirt. This happens more often than you might think. Before you load your material into the machine, you must perform a "pre-flight check."
First, always verify the dimensions. A Letter, Alphabet, Font, Rhinestone template designed for a large back patch will look ridiculous if scaled down to fit on a baby onesie without adjusting the stone size. Conversely, scaling up a design intended for small stones can result in gaps between the rhinestones, making the design look sparse.
Second, ensure your software settings match the template. In Cricut Design Space or Silhouette Studio, check that the line style is set to "cut" and not "draw." A surprisingly common mistake is sending the file to the printer instead of the cutter because the layer properties were not checked.
Material Matters: Beyond the Digital File
The digital file is only as good as the physical materials you use. A high-quality SVG file cannot compensate for low-quality rhinestone transfer tape or poor-grade hotfix stones.
When working with alphabet templates, consistency is key. Ensure you are using the same brand and size of rhinestones throughout the project. Mixing SS10 stones from two different manufacturers can result in slight variations in height and color reflectivity, which will be glaringly obvious in a linear text design.
Furthermore, consider the application surface. While these templates are perfect for t-shirts, mugs, and cushions, the fabric composition matters. A highly textured fleece or a very stretchy spandex requires a different approach to adhesive and heat pressure than a standard cotton tote bag. Always do a test press on a scrap piece of fabric similar to your final product.
Making the Template Work for You
While the prompt notes that these files are editable, many users hesitate to modify them. However, the true value of an Letter, Alphabet, Font, Rhinestone pack lies in its versatility. Do not feel constrained to the pre-arranged layout.
For example, if you are creating a monogram, you might want to isolate a single letter rather than using the whole alphabet. Use the "Ungroup" function in your software to separate the letters. This allows you to mix and match fonts, perhaps pairing a bold block letter with a cursive accent.
Additionally, think about negative space. Sometimes, the most professional-looking designs are not the ones packed with the most bling, but the ones that use white space effectively to let the letters breathe. If your design feels cluttered, try increasing the spacing between the letters or reducing the overall size of the word.
Final Quality Assurance
Before you commit to cutting your expensive rhinestone flock or template material, run a simulation. If your software allows it, use the "Weld" or "Attach" features to ensure the letters move as a single unit relative to each other. If you skip this step, the software may rearrange the letters to save material, scattering your "A" here and your "B" there, ruining the intended layout.
By respecting the technical requirements of the file formats, choosing appropriate font styles, and preparing your materials correctly, you transform a simple digital download into a high-value, sparkling masterpiece. Treat the template as a blueprint, and with a little attention to detail, your rhinestone creations will look professional, polished, and dazzling.